A Comprehensive Guide To Drawing A Christmas Tree: A Step-by-Step Exploration
A Comprehensive Guide to Drawing a Christmas Tree: A Step-by-Step Exploration
Related Articles: A Comprehensive Guide to Drawing a Christmas Tree: A Step-by-Step Exploration
Introduction
In this auspicious occasion, we are delighted to delve into the intriguing topic related to A Comprehensive Guide to Drawing a Christmas Tree: A Step-by-Step Exploration. Let’s weave interesting information and offer fresh perspectives to the readers.
Table of Content
A Comprehensive Guide to Drawing a Christmas Tree: A Step-by-Step Exploration
The Christmas tree, a symbol of joy and celebration, holds a special place in our hearts. Its iconic silhouette, adorned with twinkling lights and festive ornaments, evokes a sense of warmth and wonder. Capturing this essence on paper can be a rewarding artistic endeavor, offering a tangible representation of the holiday spirit. This guide aims to provide a comprehensive understanding of the process, empowering individuals to create their own artistic interpretations of this beloved symbol.
Understanding the Anatomy of a Christmas Tree
Before embarking on the drawing process, it’s essential to familiarize oneself with the fundamental structure of a Christmas tree. Its distinct triangular shape, with a pointed apex and a broad base, serves as the foundation for our drawing. The branches, radiating outwards from the central trunk, create a layered effect, adding depth and dimension. The needles, depending on the species, can range from sharp and prickly to soft and delicate. These details contribute to the tree’s overall character and visual appeal.
Essential Tools and Materials
To embark on this artistic journey, gather the following tools and materials:
- Paper: Choose a sheet of paper with a smooth surface, preferably drawing paper or sketchpad paper.
- Pencil: A pencil with a medium-hard lead (HB) is ideal for initial sketching and outlining.
- Eraser: A good quality eraser is essential for correcting mistakes and refining lines.
-
Drawing tools: A variety of drawing tools can be used to enhance the final drawing. These include:
- Colored pencils: Offer a wide range of colors and allow for blending and shading.
- Markers: Provide bold, vibrant colors and create quick, expressive strokes.
- Watercolors: Offer a soft, ethereal effect and allow for layering and blending.
- Crayons: Offer a unique texture and a wide range of colors, suitable for younger artists.
Step-by-Step Guide to Drawing a Christmas Tree
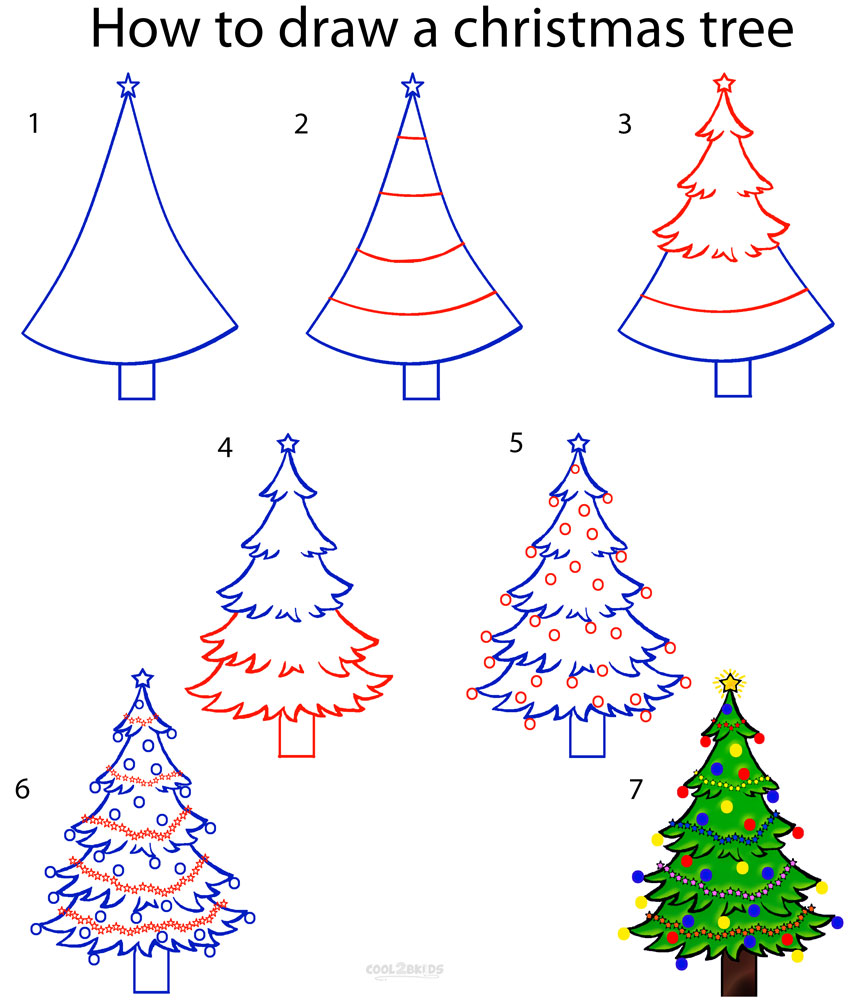
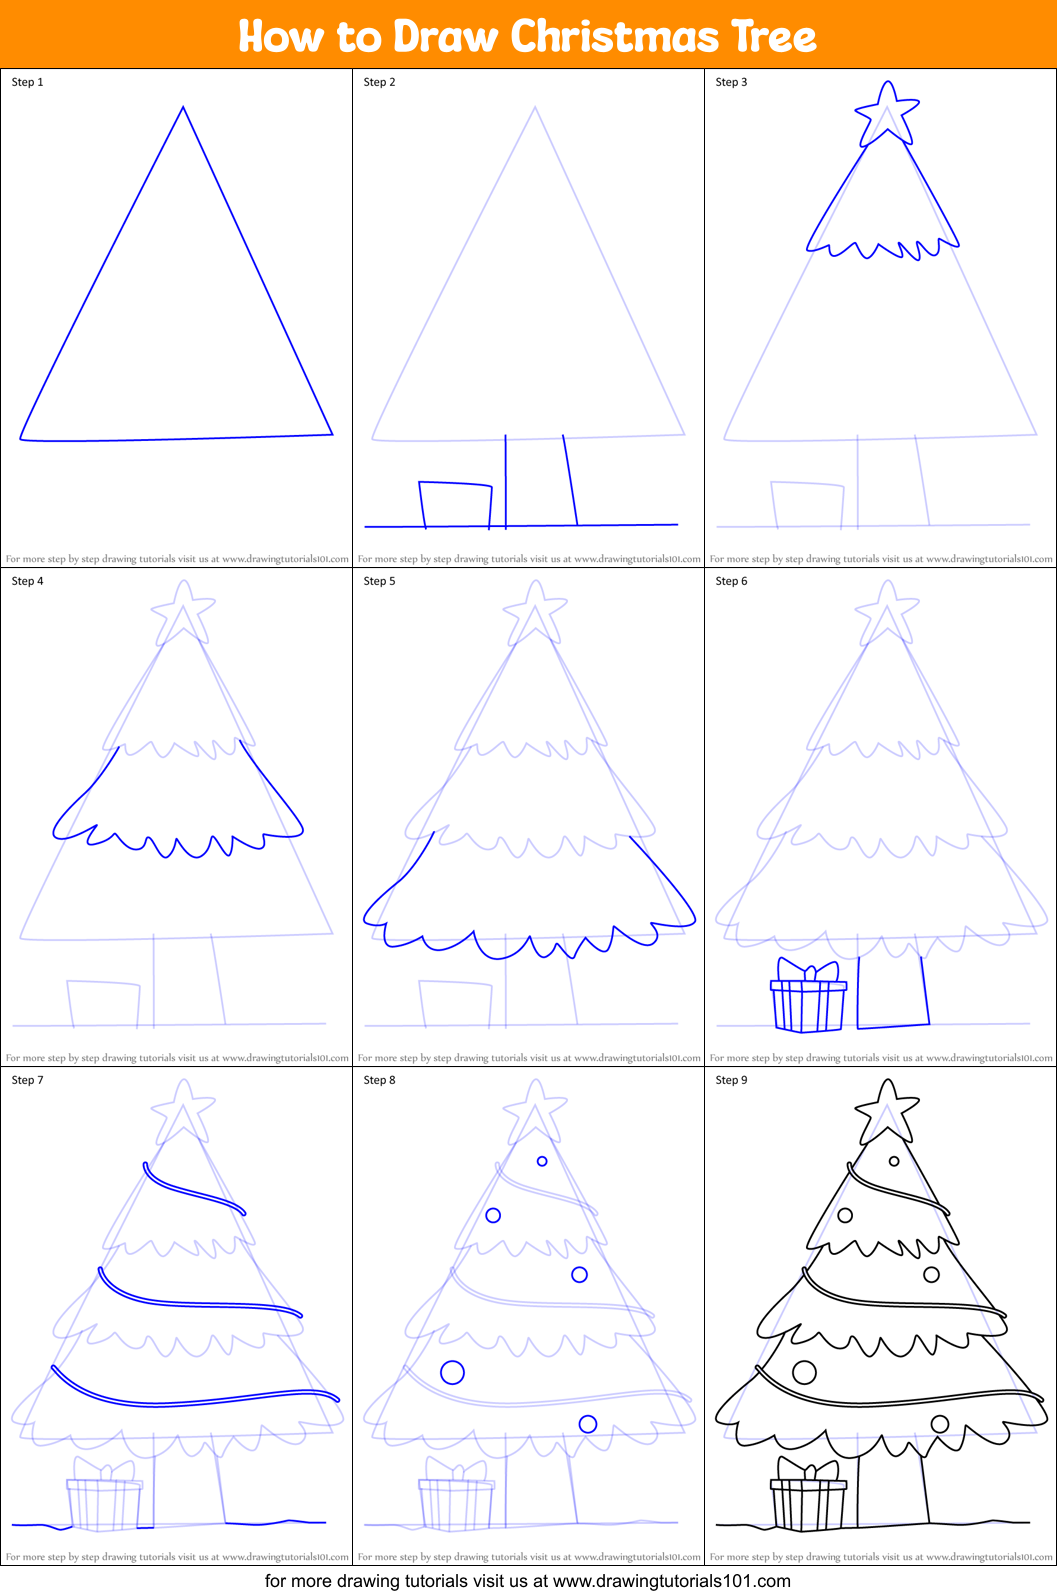
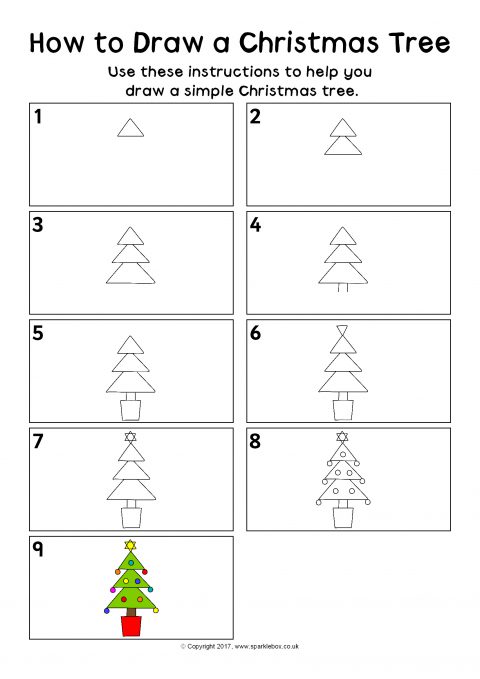
1. Sketching the Basic Structure:
- Start with a simple triangle: Draw a triangle on the paper, representing the overall shape of the Christmas tree. The size and proportion of the triangle can be adjusted according to your preference.
- Add the trunk: Draw a vertical line extending from the base of the triangle, representing the tree’s trunk. The trunk should be slightly narrower at the top, gradually widening towards the base.
- Outline the branches: Draw curved lines radiating outwards from the trunk, mimicking the branching pattern of a Christmas tree. Begin with a few prominent branches at the base, gradually adding smaller branches as you move upwards towards the apex.
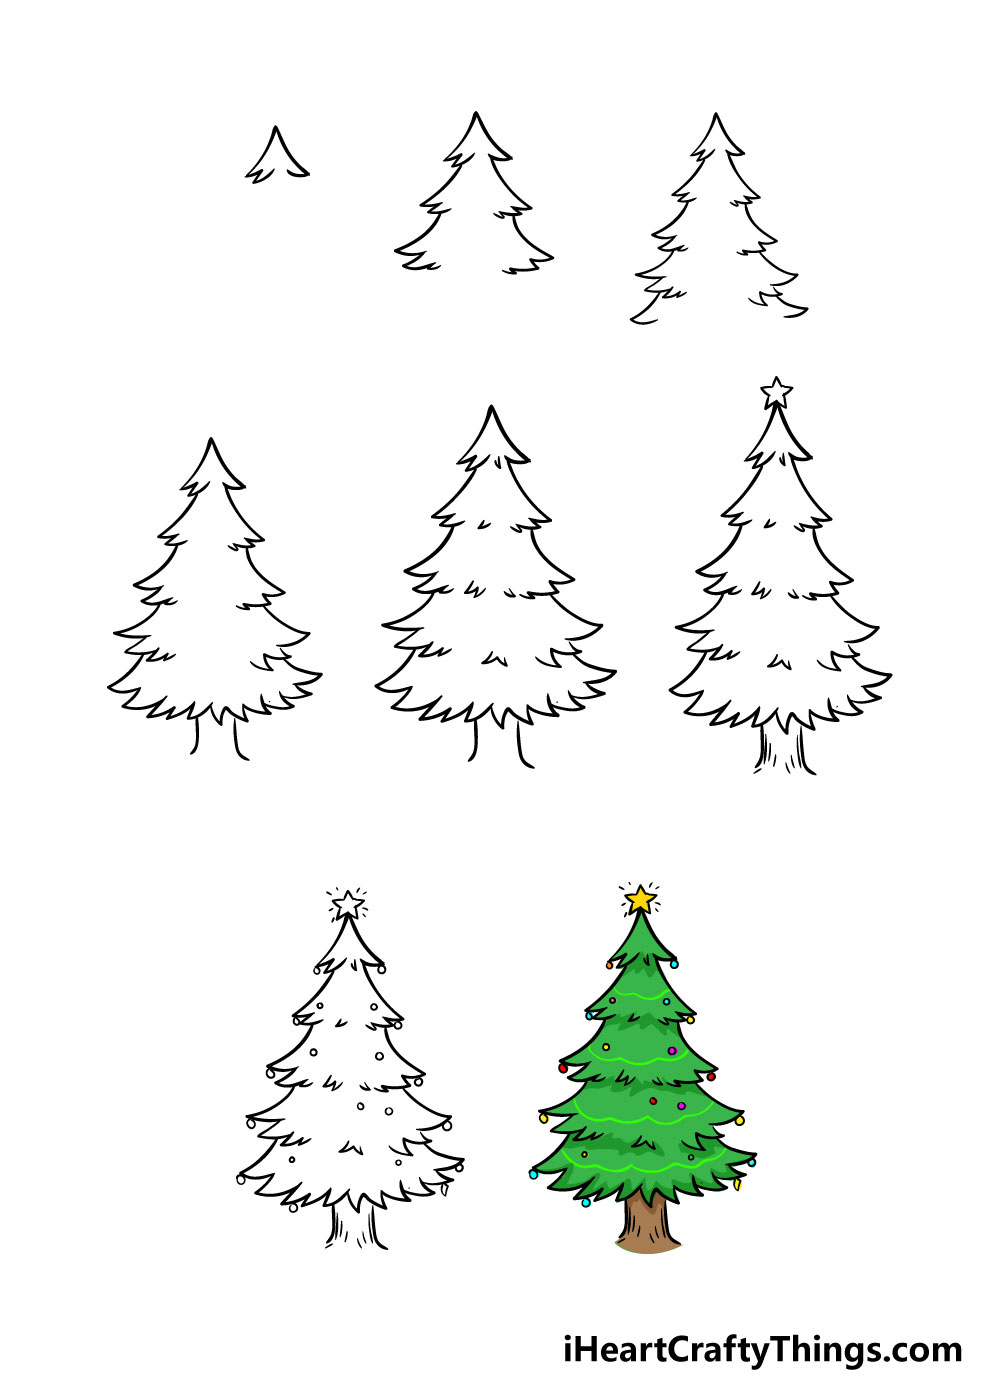
2. Refining the Shape and Detail:
- Define the branches: Use a darker pencil or drawing tool to define the branches, adding thickness and detail. Vary the length and curvature of the branches to create a natural, asymmetrical effect.
- Add needles: Draw small, triangular shapes along the branches, representing the needles. The density and size of the needles can be adjusted to create different textures and visual effects.
- Shade the trunk: Using a darker pencil or marker, shade the trunk, adding depth and texture. Pay attention to the light source, creating highlights and shadows to enhance the three-dimensional effect.
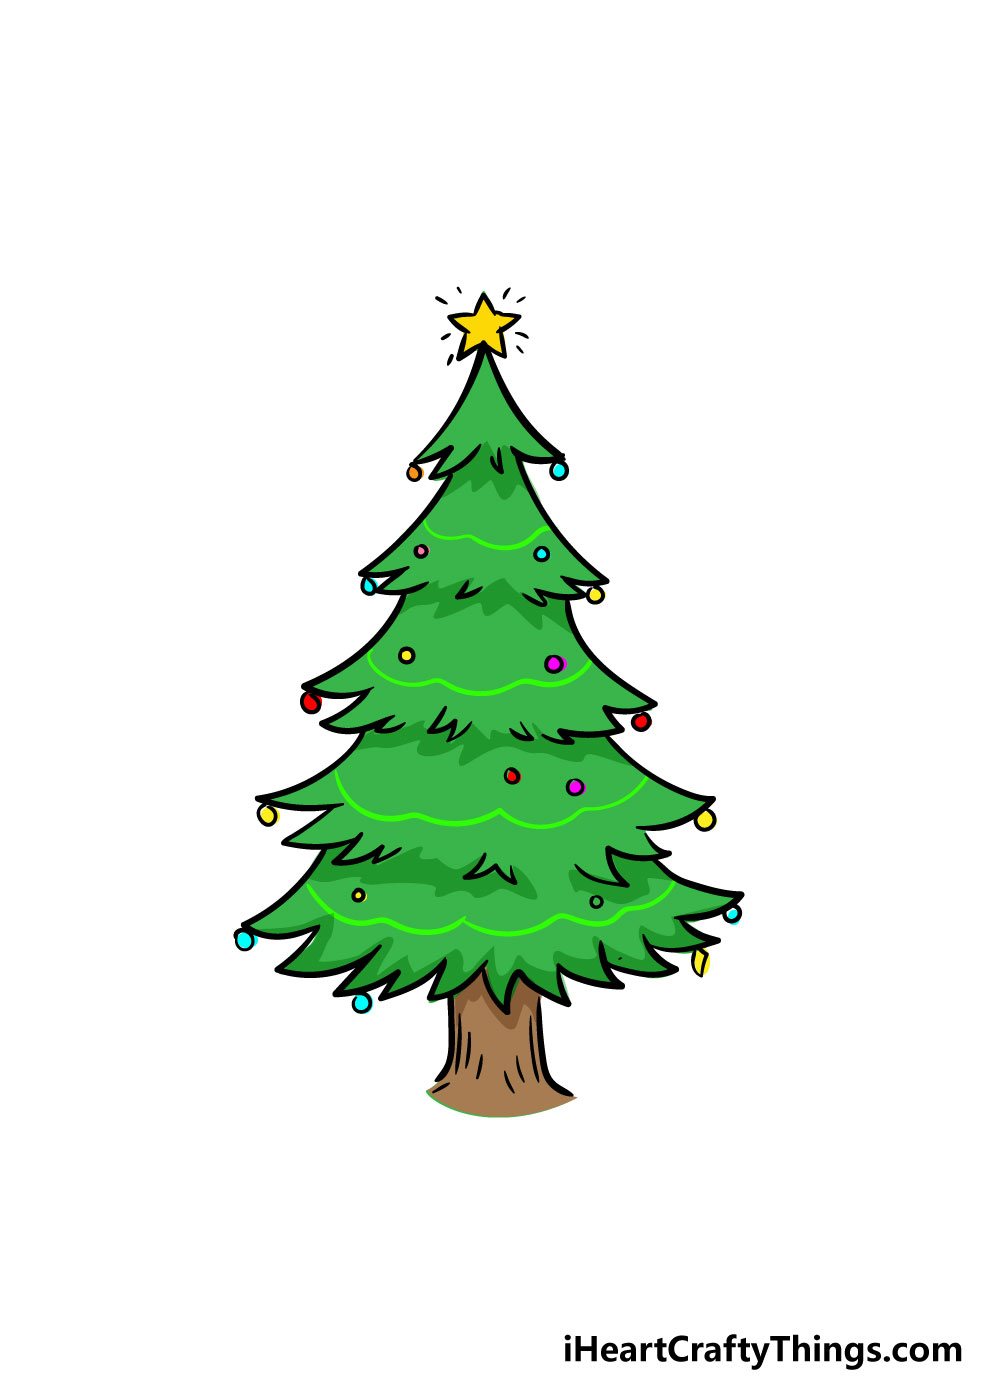
- Add a star or ornament: To add a festive touch, draw a star at the apex of the tree, representing the traditional Christmas tree topper. Alternatively, you can add a decorative ornament or a string of lights.
3. Adding Color and Texture:
- Choose a color palette: Select a color scheme that reflects the desired mood and style. Traditional Christmas tree colors include green, red, gold, and silver. However, feel free to experiment with other colors to create a unique and personal interpretation.
- Apply color to the tree: Use colored pencils, markers, or watercolors to fill in the tree’s branches and needles. Blend the colors gently to create a natural, layered effect.
- Add detail to the ornaments: If you’ve included ornaments, use a variety of colors and textures to add detail and visual interest.
- Consider background elements: Add a background to enhance the composition. This could include a snowy landscape, a starry night sky, or a festive fireplace.
4. Final Touches and Refinement:
- Review and adjust: Once the drawing is complete, take a step back and review the composition. Make any necessary adjustments to the shape, proportions, and color balance.
- Add final details: Include subtle details like a snow-covered base, a festive ribbon, or a twinkling light effect to further enhance the drawing.
- Sign your artwork: Sign your name or initials at the bottom of the drawing to personalize your creation.
Beyond the Basics: Exploring Different Styles and Techniques
While the above steps provide a solid foundation for drawing a Christmas tree, the possibilities are endless. Explore different styles and techniques to create unique and expressive interpretations:
- Abstract Christmas trees: Experiment with geometric shapes, bold lines, and vibrant colors to create abstract representations of the Christmas tree.
- Stylized Christmas trees: Incorporate elements of popular culture, such as cartoon characters or geometric patterns, to create a whimsical and playful Christmas tree.
- Realistic Christmas trees: Focus on capturing the intricate details of a specific species of Christmas tree, such as the delicate needles of a Norway spruce or the dense foliage of a Douglas fir.
FAQs
Q: What are some tips for drawing a Christmas tree that looks realistic?
A: To achieve a realistic look, pay attention to the following details:
- Branching pattern: Observe the natural branching pattern of a Christmas tree. Branches tend to grow in a spiral pattern, with smaller branches branching off from larger ones.
- Needle texture: Draw different sizes and shapes of needles to create a varied and realistic texture.
- Lighting and shadows: Consider the direction of light and how it affects the shape and texture of the tree. Add shadows to create depth and dimension.
Q: What are some creative ways to add ornaments to my Christmas tree drawing?
A: There are many ways to incorporate ornaments:
- Geometric shapes: Use simple geometric shapes like circles, squares, and triangles to represent ornaments.
- Detailed designs: Draw intricate patterns, like snowflakes or stars, on the ornaments.
- Realistic ornaments: Capture the details of specific ornaments, like glass baubles, candy canes, or wooden toys.
Q: How can I make my Christmas tree drawing more festive?
A: To create a festive atmosphere:
- Add twinkling lights: Use white or colored dots to represent twinkling lights on the tree.
- Incorporate a snowy background: Create a snowy landscape with a soft, white background.
- Add a festive ribbon: Draw a ribbon around the base of the tree, adding a touch of color and festivity.
Tips
- Start with a light sketch: Begin with a light pencil sketch, allowing for easy corrections and refinement.
- Use a variety of drawing tools: Experiment with different tools, such as pencils, markers, and watercolors, to create a unique and dynamic drawing.
- Practice and observe: Practice drawing different types of Christmas trees and observe their details to improve your skills.
- Don’t be afraid to experiment: Try different techniques, color palettes, and styles to find your own unique artistic expression.
Conclusion
Drawing a Christmas tree is an enjoyable and rewarding artistic endeavor. By understanding the basic structure, utilizing the right tools, and following the step-by-step guide, individuals can create beautiful and personalized representations of this iconic holiday symbol. Whether it’s a simple sketch or a detailed masterpiece, the process offers a creative outlet for expressing the joy and wonder of the holiday season. So, gather your materials, unleash your imagination, and embark on your own artistic journey to capture the essence of the Christmas tree.


Closure
Thus, we hope this article has provided valuable insights into A Comprehensive Guide to Drawing a Christmas Tree: A Step-by-Step Exploration. We appreciate your attention to our article. See you in our next article!