A Guide To Drawing A Christmas Tree: From Simple Sketches To Detailed Illustrations
A Guide to Drawing a Christmas Tree: From Simple Sketches to Detailed Illustrations
Related Articles: A Guide to Drawing a Christmas Tree: From Simple Sketches to Detailed Illustrations
Introduction
With great pleasure, we will explore the intriguing topic related to A Guide to Drawing a Christmas Tree: From Simple Sketches to Detailed Illustrations. Let’s weave interesting information and offer fresh perspectives to the readers.
Table of Content
A Guide to Drawing a Christmas Tree: From Simple Sketches to Detailed Illustrations

The Christmas tree, a symbol of festive cheer and holiday spirit, holds a special place in our cultural imagination. Its iconic silhouette, adorned with twinkling lights and colorful ornaments, evokes feelings of warmth, joy, and togetherness. While capturing the essence of this beloved symbol in a drawing may seem daunting, it is a rewarding endeavor accessible to artists of all skill levels. This comprehensive guide provides a step-by-step approach to drawing a Christmas tree, encompassing various techniques and styles to suit diverse preferences.
Understanding the Basics: The Structure and Shape
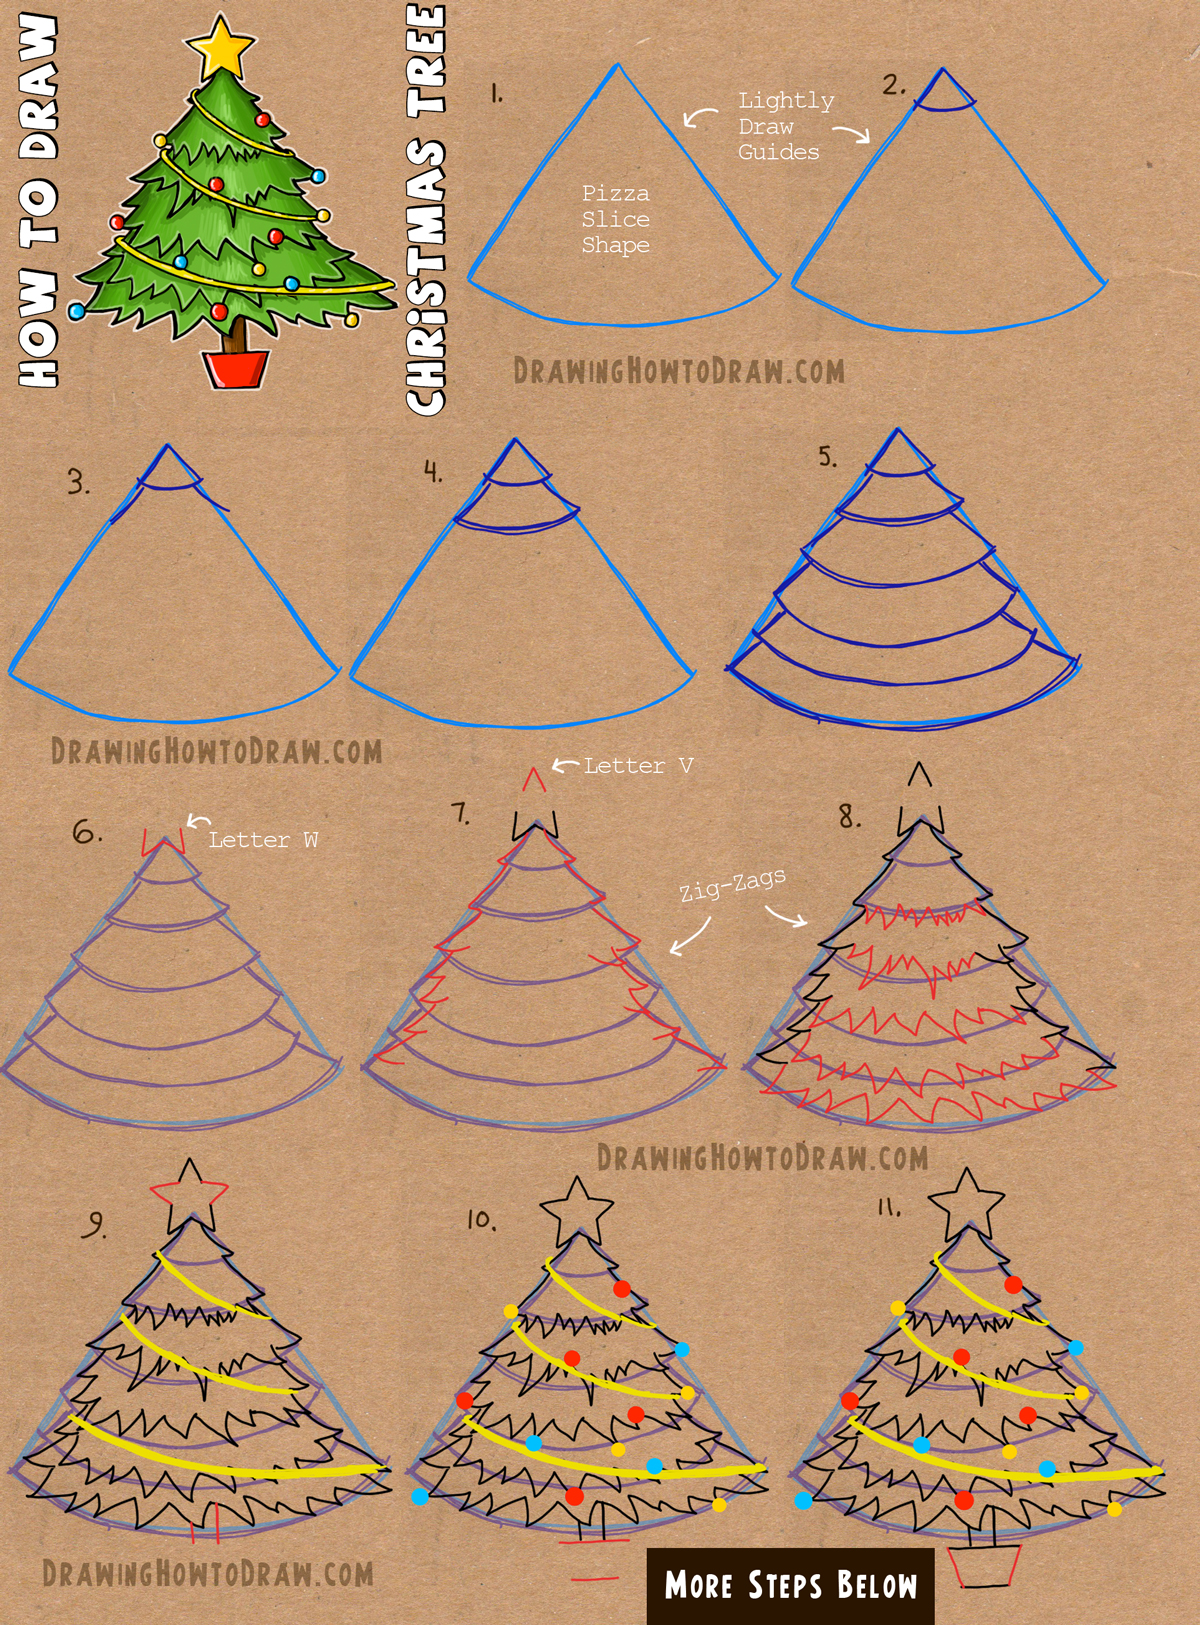
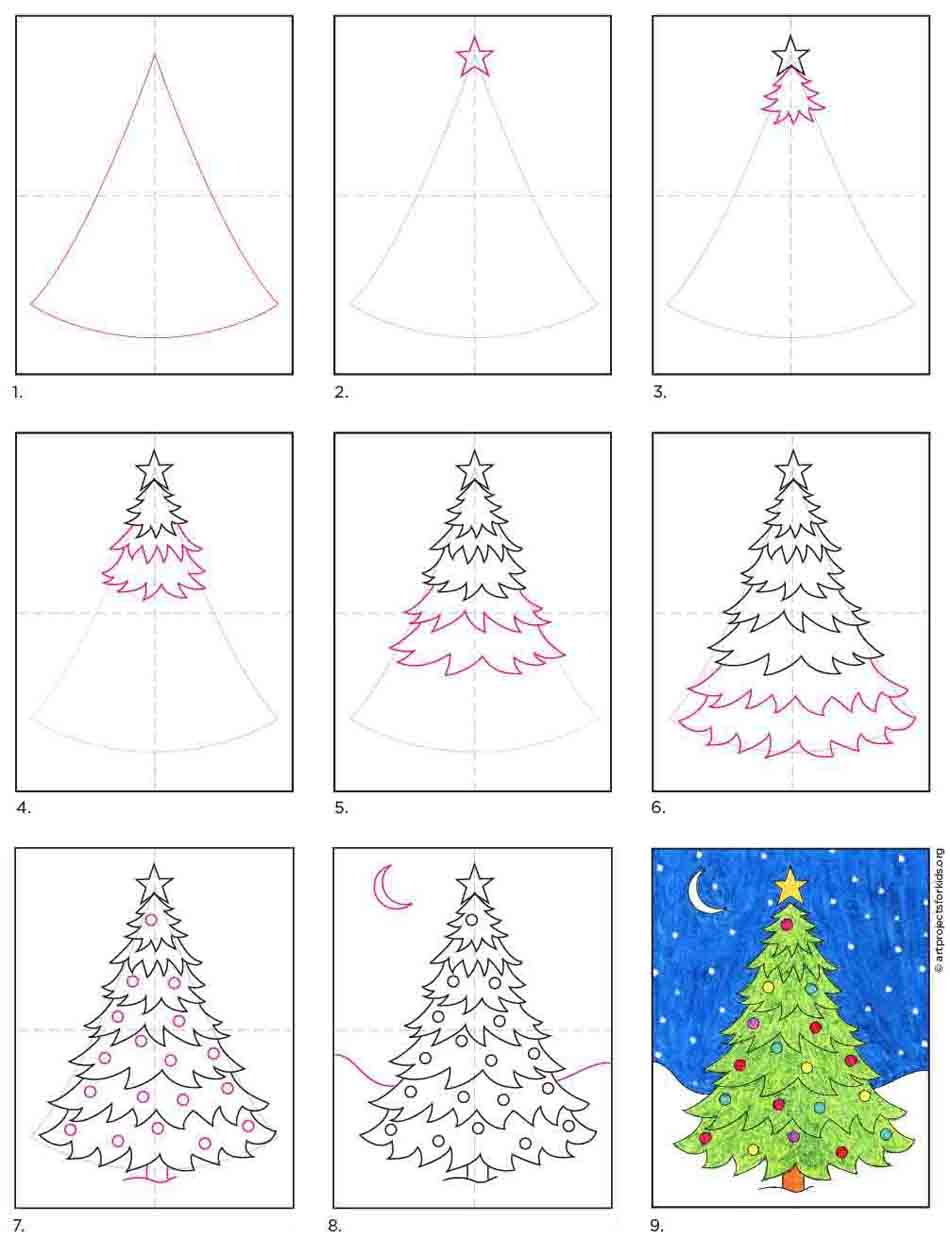
The foundation of a successful Christmas tree drawing lies in understanding its fundamental structure. At its core, the Christmas tree is essentially a triangle, tapering towards the top. This simple geometric shape serves as the starting point for our artistic journey.
Step 1: The Foundation: The Triangle
Begin by lightly sketching a triangle on your paper. The size and orientation of the triangle will determine the overall scale and perspective of your Christmas tree. A wider base creates a more robust and grounded tree, while a narrower base lends a more elegant and slender appearance.
Step 2: Adding Depth and Dimension: The Trunk and Branches
Once the triangle is established, add a central vertical line to represent the trunk. This line should extend from the base of the triangle to its apex, serving as the structural backbone of the tree. Next, draw branches extending outwards from the trunk. These branches should gradually decrease in length as they ascend the tree, creating a visually appealing taper.
Step 3: Defining the Foliage: Creating a Realistic Texture
The Christmas tree’s foliage is what truly brings it to life. To achieve a realistic texture, experiment with different techniques. One common method is to use short, curved lines to represent individual needles, creating a dense and layered effect. Alternatively, you can use a series of small, overlapping circles or dots to simulate the texture of pine needles.
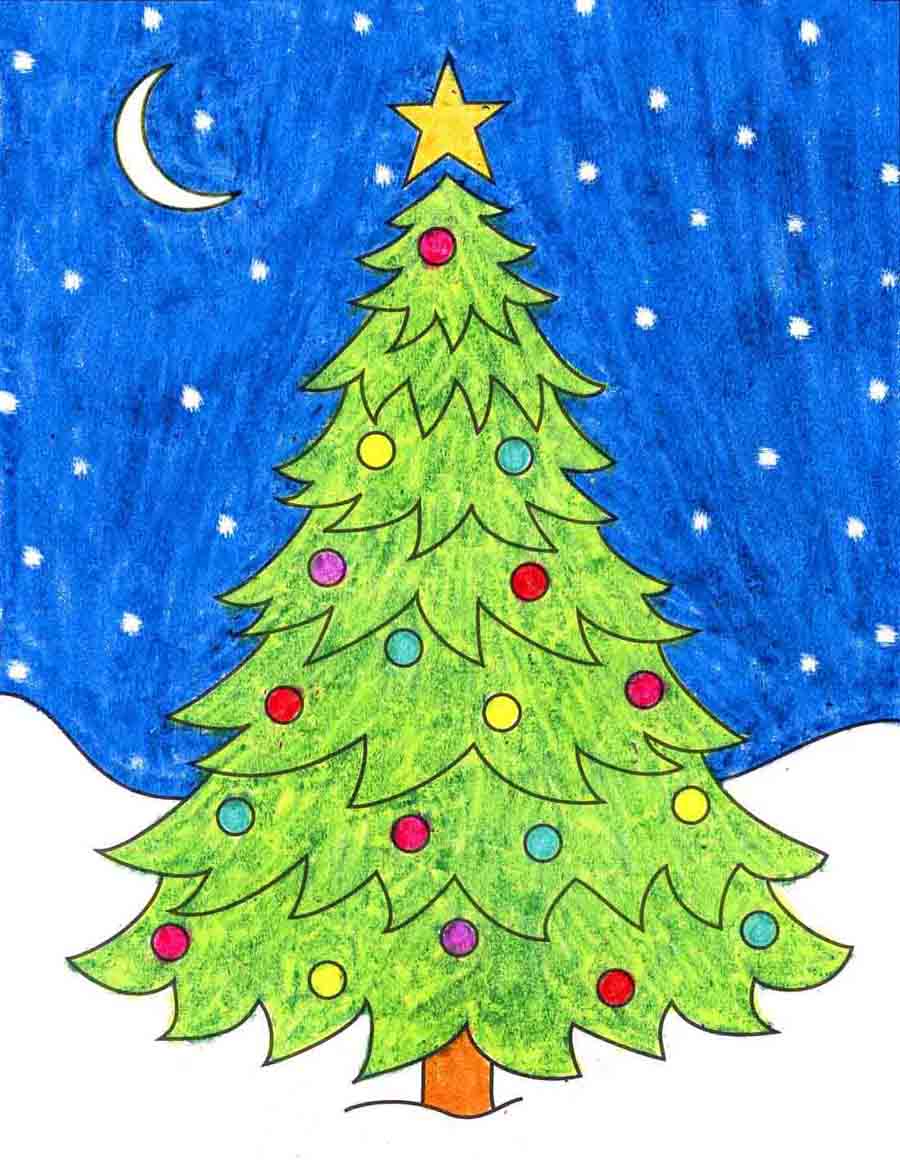
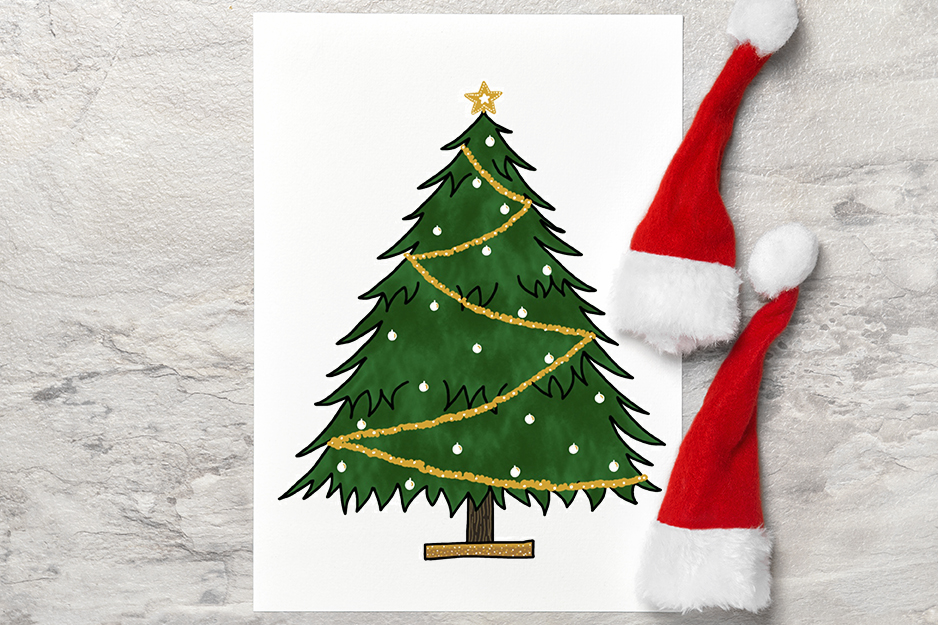
Step 4: Adding Details: Ornaments, Lights, and a Star
Now it’s time to embellish your Christmas tree with festive details. Begin by adding ornaments. These can be simple circles or more intricate shapes, such as stars, bells, or snowflakes. To create a sense of depth, vary the sizes and positions of the ornaments. Next, add strings of lights, using small, evenly spaced dots or dashes. Finally, place a star at the apex of the tree, symbolizing the guiding light of the holiday season.
Exploring Different Styles: Beyond the Traditional
While the classic Christmas tree silhouette is instantly recognizable, there are numerous variations and styles to explore, allowing for personalized artistic expression.
1. Abstract Christmas Trees: For a more contemporary approach, consider abstracting the traditional Christmas tree shape. This could involve using geometric forms, bold lines, or simplified textures to create a stylized and unique interpretation.
2. Impressionistic Christmas Trees: Inspired by the Impressionist movement, capture the essence of the Christmas tree through loose brushstrokes and vibrant colors. Focus on capturing the light and atmosphere surrounding the tree, conveying a sense of movement and spontaneity.
3. Cartoon Christmas Trees: Embrace the playful world of cartoons by drawing a simplified and whimsical Christmas tree. Use exaggerated proportions, bright colors, and playful expressions to create a charming and humorous depiction.
4. Minimalist Christmas Trees: Opt for a minimalist approach, using clean lines and simple shapes to create a clean and elegant representation of the Christmas tree. This style emphasizes simplicity and form over intricate details.
5. Geometric Christmas Trees: Explore the world of geometric shapes by constructing a Christmas tree using triangles, squares, or other geometric forms. This style offers a unique and visually striking interpretation of the traditional Christmas tree.
FAQs: Addressing Common Questions
Q: What materials are best for drawing a Christmas tree?
A: The choice of materials depends on your personal preference and desired style. Pencils, pens, markers, crayons, and even digital drawing tools can all be used effectively.
Q: What colors are most commonly used for Christmas trees?
A: While green is the most traditional color for Christmas trees, feel free to experiment with other colors. Gold, silver, blue, and even purple can add a unique and festive touch.
Q: How can I add depth and dimension to my Christmas tree drawing?
A: Use shading, layering, and perspective techniques to create a sense of depth and realism. Experiment with light and shadow to enhance the three-dimensionality of your drawing.
Q: What are some tips for creating a realistic Christmas tree drawing?
A: Observe real Christmas trees for inspiration. Pay attention to the shape, texture, and arrangement of the branches. Use a variety of lines and shading techniques to create a realistic representation of the needles.
Q: How can I make my Christmas tree drawing more unique?
A: Explore different styles and techniques. Add personal touches, such as unique ornaments or a specific setting. Incorporate elements that reflect your own artistic vision and personality.
Tips: Enhancing Your Artistic Expression
- Practice Makes Perfect: The key to improving your drawing skills is consistent practice. Spend time sketching different types of trees, experimenting with different techniques and styles.
- Observe Nature: Study real Christmas trees, paying attention to their shape, texture, and how light interacts with their foliage. This observation will inform your artistic decisions.
- Use Reference Images: Refer to photographs or illustrations of Christmas trees for inspiration and guidance. This will help you refine your understanding of the subject’s form and details.
- Experiment with Different Media: Explore various drawing tools, such as pencils, pens, charcoal, or digital software, to find the medium that best suits your style and preferences.
- Don’t Be Afraid to Make Mistakes: Mistakes are part of the learning process. Embrace them as opportunities to learn and grow.
Conclusion: The Joy of Creating
Drawing a Christmas tree is not just a technical exercise; it is an opportunity to tap into the festive spirit and express your creativity. Whether you choose to create a traditional, stylized, or abstract interpretation, the process of bringing this beloved symbol to life on paper is a rewarding and enjoyable experience. So, gather your drawing tools, unleash your imagination, and let your artistic spirit shine through as you create your own unique Christmas tree masterpiece.


Closure
Thus, we hope this article has provided valuable insights into A Guide to Drawing a Christmas Tree: From Simple Sketches to Detailed Illustrations. We thank you for taking the time to read this article. See you in our next article!